
Uv Small Printers are compact digital machines that print directly onto objects, panels, and specialty materials. They use ultraviolet light to cure ink almost immediately after deposition. This differs from traditional printers, where ink must absorb or evaporate before handling.
“UV ink is cured, not dried, which expands the range of printable surfaces,” explains Ray Weiss, a recognized digital-printing specialist and former Roland DGA product marketing leader. His observation captures the central idea. The printer places tiny ink droplets on the surface. UV LEDs then harden those droplets within seconds. A typical workflow includes artwork preparation, substrate cleaning, print-height adjustment, and controlled curing. Small errors still matter. Dust can create pinholes. Excessive height can soften fine text.
The appeal is practical. Uv Small Printers can produce short runs, personalized products, signage, packaging samples, and promotional items without traditional plates. Many models handle acrylic, coated metal, glass, wood, leather, and selected plastics. Results depend on surface energy, ink adhesion, curing power, and operator experience. Not every material accepts UV ink reliably. A glossy object may require testing or primer. Some prints can also feel raised, especially when white ink or varnish is layered.
This technology is useful, but it is not effortless. Operators must manage ventilation, eye protection, maintenance, and manufacturer instructions. A careful test print remains more trustworthy than a confident assumption. This guide explains the components, curing process, applications, limitations, and selection criteria behind modern Uv Small Printers.
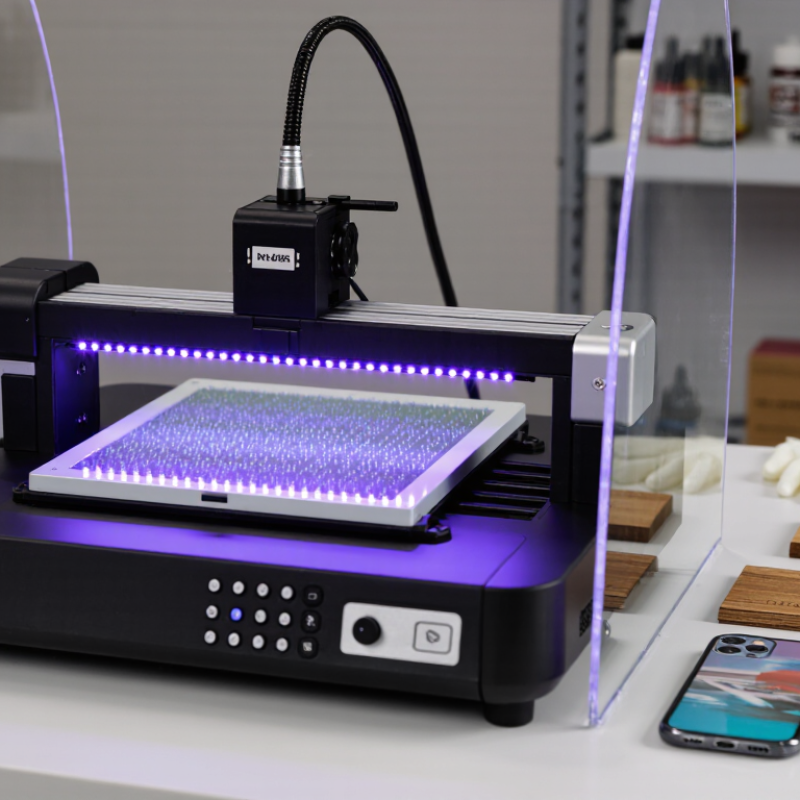
UV small printers are compact digital printing systems that use ultraviolet LED light to cure ink immediately after it is deposited. Unlike conventional ink, the liquid does not need long air-drying time. The printer applies tiny ink droplets, then UV LEDs harden them within seconds. This creates a sharp, durable surface on selected materials.
The machine usually includes a flatbed, printhead, ink reservoirs, UV-LED modules, and software for positioning artwork. An operator places an item on the bed, adjusts its height, and sends the design to print. The LEDs follow the printing path closely. This setup supports detailed graphics on wood, acrylic, coated metal, glass, leather, and some plastics. Material testing remains essential.
Small UV printers fit workshops, studios, and short-run production areas. They can print textured layers, white ink, and clear effects when the system supports them. The results often feel slightly raised under a fingertip. That detail is useful for decorative panels and personalized products.
However, curing performance depends on ink, surface treatment, lamp intensity, and print speed. A first test may look uneven. Dust, poor alignment, or an unsuitable coating can reduce adhesion. Even experienced operators should check scratch resistance and color accuracy before producing a larger batch. These printers are efficient, but they are not magic.
A UV small printer is a compact digital machine that prints and cures ink on demand. Unlike solvent systems, it uses ultraviolet light to harden ink almost immediately. Grand View Research valued the global UV LED market at approximately US$1.3 billion in 2023, with strong growth expected through 2030. The figure shows expanding curing demand, not guaranteed print quality.
The printhead is the precision center. It releases microscopic droplets while controlling drop size, nozzle frequency, and carriage alignment. Small variations can produce banding, fuzzy text, or uneven gradients. CMYK channels create color, while the white channel builds opacity on dark, clear, or textured materials. Varnish adds gloss, raised effects, or spot highlights. These channels require careful circulation. White ink settles quickly. Calibration remains essential.
UV LEDs cure each layer immediately after deposition. Their wavelength, intensity, exposure time, and distance affect adhesion and surface finish. Too little energy leaves a tacky surface; excessive exposure may distort thin plastics. Smithers’ 2024 digital packaging print study valued this broader market at more than US$20 billion globally, driven partly by short-run customization. Still, a bright sample can mislead. Operators must test ink adhesion, color stability, and white coverage on the actual substrate. The difficult part is not pressing print. It is controlling small variables consistently.
Core Components: Printheads, UV LEDs, and CMYK+White+Varnish Channels
The table summarizes commonly used specifications and operating characteristics of small-format UV printers. Values are representative industry ranges and can vary according to printer configuration, ink formulation, substrate, and print mode.
| Component / Dimension | Typical Data | Primary Function | Practical Effect on Printing |
|---|---|---|---|
| Printhead technology | Piezoelectric drop-on-demand inkjet | Generates and places individual ink droplets without continuously spraying ink. | Supports accurate text, graphics, and variable droplet placement. |
| Ink droplet volume | Approximately 3–30 picoliters per droplet, depending on printhead and mode | Controls how much ink is deposited in each firing cycle. | Smaller droplets improve fine detail; larger droplets increase coverage and solid density. |
| Nozzle configuration | Multiple linear nozzle arrays; nozzle counts vary widely by printhead model | Places droplets across the print swath as the carriage or substrate moves. | More active nozzles can improve throughput and reduce the number of passes. |
| Print resolution | Common selectable settings: approximately 600–1,440 dpi | Defines the addressable placement density of ink droplets. | Higher settings can improve detail but usually increase processing time and ink usage. |
| UV LED wavelength | Typically about 365–405 nanometers; many systems operate near 395–405 nanometers | Emits ultraviolet energy that initiates curing of UV-reactive ink. | Determines compatibility with the photoinitiator system and affects curing performance. |
| UV curing method | LED exposure immediately after or during ink deposition | Converts liquid ink into a solid polymer film through photochemical curing. | Allows printing on many rigid or flexible materials with minimal drying time. |
| LED thermal output | Lower radiant heat than traditional mercury-vapor UV lamps, though heat management is still required | Provides curing energy while helping limit heat exposure to the substrate. | Can reduce deformation risk on some heat-sensitive materials. |
| CMYK channels | Cyan, Magenta, Yellow, and Black | Builds process colors using halftone dots and controlled ink densities. | Produces the main color gamut for photographic images, graphics, and text. |
| White ink channel | Optional or standard on many UV configurations; commonly used as a spot, underlay, or overprint layer | Creates opacity and a neutral base on dark, transparent, or colored substrates. | Improves color brightness and enables layered effects on non-white media. |
| Varnish channel | Clear UV-curable coating; availability depends on the ink and printer configuration | Adds a transparent gloss, satin, or raised-texture effect to selected areas. | Enhances tactile appearance, contrast, and decorative finishing options. |
| Ink layer order | Common modes include CMYK, White+CMYK, CMYK+White, and CMYK+White+Varnish | Determines how color, opacity, and clear effects are stacked. | Layer order influences color density, visual depth, and substrate appearance. |
| Substrate compatibility | Common examples include acrylic, glass, metal, wood, coated paper, plastics, leather, and selected textiles | Directly deposits and cures ink on the surface or on a suitable coating. | Expands applications beyond conventional absorbent paper printing. |
| Typical small-printer print area | Often from approximately A4 size to A2 size, depending on machine design | Defines the maximum printable width and length for a single job. | Suitable for customized products, signage, samples, packaging, and short-run work. |
| Curing status after printing | Usually touch-dry immediately after adequate UV exposure; full performance depends on formulation and dosage | Stabilizes the printed layer for handling and further processing. | Reduces waiting time compared with water-based ink drying. |
| Step | Process | Main Control Factor |
|---|---|---|
| 1. File preparation | The RIP or printer software separates artwork into CMYK, white, and varnish layers. | Color management, layer order, and spot-channel settings. |
| 2. Droplet generation | The printhead converts electrical pulses into controlled ink droplets. | Firing frequency, droplet volume, nozzle condition, and carriage speed. |
| 3. Layer deposition | CMYK, white, and varnish are deposited in a programmed sequence on the substrate. | Ink density, pass count, substrate height, and layer alignment. |
| 4. UV exposure | UV LEDs irradiate the wet ink and initiate polymerization. | Wavelength, irradiance, exposure time, and ink photochemistry. |
| 5. Finished output | The cured image can usually be handled immediately, subject to the required durability and application conditions. | Surface preparation, adhesion, final cure, and environmental resistance requirements. |
Note: Actual performance depends on printhead architecture, ink chemistry, UV dose, substrate surface energy, maintenance condition, and selected print mode.
UV small printers create images by placing tiny droplets of UV-curable ink onto a surface. Their compact frames suit workshops, sample rooms, and short-run production. The process starts with digital artwork and precise printhead movement. Each pass controls droplet size, spacing, and color position. Unlike heat-based drying, the ink stays workable for a brief moment. That timing matters.
After jetting, a UV lamp travels with or near the printhead. Its light triggers polymerization, changing liquid ink into a solid film almost instantly. The printer builds the image through repeated layers. A base layer can improve opacity on dark materials, while raised layers add tactile texture. White ink often acts as a foundation, not merely another color. Operators must balance lamp intensity, carriage speed, and layer height. Too much exposure may produce brittle surfaces. Too little can leave a tacky finish. Small errors become visible under angled light.
Tips: Clean the print surface and confirm its coating before production. Run a small test grid first. Check adhesion after curing, not immediately. Touching the surface too soon can mislead you. Keep dust away from the lamp window and print zone. Record settings for each material, because plastic, glass, wood, and coated metal behave differently. Instant curing does not guarantee perfect bonding. Some jobs still need surface preparation or a second test. I would question “one setting fits all.” It saves time only until reprints begin.
A UV small printer deposits liquid ink onto a surface and cures it with ultraviolet light. The ink hardens almost immediately. Its compact format suits short runs, samples, personalized panels, and small product parts. The important question is not only print size. It is material compatibility.
Flat media usually gives the most predictable results. Acrylic, coated board, glass, metal, wood, and rigid plastics can often work after proper cleaning and testing. Objects also need careful support. A simple jig can prevent movement and keep the surface aligned beneath the print head. Cylindrical or uneven items may require special positioning. They are possible, but not automatically easy.
A substrate up to 50 mm thick may fit beneath the printer head, depending on the machine’s stated clearance. That measurement is a maximum, not a promise of perfect printing. Check the object’s height at every point, including edges and raised details. Leave enough space for safe head movement. Very soft, dusty, oily, or heat-sensitive materials can cause weak adhesion or surface damage. A small test swatch is practical. I have found that one successful corner can still hide problems across a full panel. Surface texture, ink absorption, and color can change the final appearance. White ink may improve contrast on dark media, but it can also reveal uneven texture. Measure twice. Test before production.
UV small printers use piezoelectric printheads to place UV-curable ink onto rigid or flexible surfaces. Ultraviolet lamps cure each pass almost immediately. Their stated resolution often ranges from 600 to 1,440 dpi. At 600 dpi, the addressable spacing is about 42 micrometres. At 1,440 dpi, it falls near 18 micrometres. These figures describe positioning capability, not guaranteed visible detail.
Variable ink drops add another layer of control. Smaller drops can sharpen fine text, edges, and skin-tone transitions. Larger drops build stronger density on dark materials. Many industrial systems operate within a broad picolitre range, depending on print mode and material. Keypoint Intelligence reports that perceived inkjet quality depends on dot placement, gray levels, and substrate interaction, not resolution alone. Smithers’ digital print research also identifies inkjet productivity and application flexibility as major market drivers. A higher number can mislead. Dust, surface energy, and curing balance still matter.
Tips: Check the native resolution, minimum drop size, and usable print modes. Test a 6-point text sample and a solid dark patch. Measure banding under angled light. I would also question perfect laboratory samples; real boards may absorb ink unevenly. Record curing power, carriage speed, and pass count during testing. These details often explain why two machines with identical dpi produce different results.
By continuing to use the site, you agree to the use of cookies. more information
The cookie settings on this website are set to "allow cookies" to give you the best browsing experience possible. If you continue to use this website without changing your cookie settings or you click "Accept" below then you are consenting to this.